#i use vapoursynth .. so i dont have to use topaz
Explore tagged Tumblr posts
Note
hello can you share your clean/denoise/sharpening settings
hello ! i dont use topaz, but my sharpening settings are:
amount: 500 / radius: 0.3 and then i add surface blur with the radius at 3, and the threshold at 2. then, i duplicate my layer and add a gaussian blur and turn down the opacity to around 40-50 depending on the gif/quality
0 notes
Note
i thought so that's why your gifs look so clean and not pixelated 😩 any recs for those who can't or are unable to use vaporsynth but make clearer gifs?
ehe thanks im glad theyre not pixelated 😭i always worry they look it
anyways ooh yeah vapoursynth has a learning curve for sure </3 if you ever want tips or help in installing or using it im always willing BUT in the case that its not viable the best advice i have is:
- make sure youre using the highest quality file you can get, it doesnt have to be a .ts file, i often work w/ anything 1080p-4k, but u probably already know that the better resolution you start with, the better your gifs will look when u export!
- if youre using photoshop, it does have built in sharpening tools, ive started using them on top of VS (ill put my smart sharpen settings under a cut at the end) just be sure to go easy and start small + adjust from there to avoid over sharpening
- try topaz for denoising/cleaning ! its cleaning setting is essentially sharpening but ive heard its a lot cleaner and gentler! i dont use it personally but its a common tool
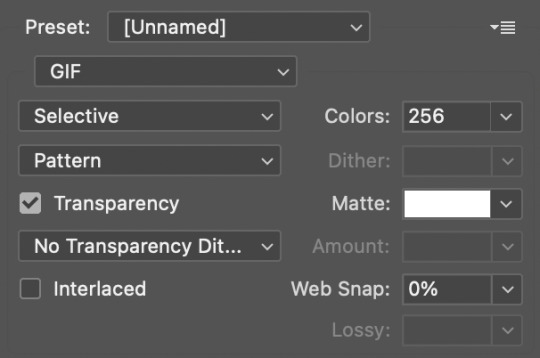
- when exporting the gif itself, it helps to keep the colors at exactly 256, but it can also come down to avoiding how hard tumblr will compress gifs .... all ur work will mean nothing if tumblr decides to put it thru the blender, so it also helps to try to aim for your gif to be between 3-8mb! 10mb is the limit, but being under that by a few MB is ideal
uhm <3 im still new to the gifmaking process ofc so my advice isnt final, but i hope any of this helps. i have a resource blog here with a tutorials tag if you want to go through and see others tutorials on how they do gifmaking ! i try to compile a lot of different methods :)
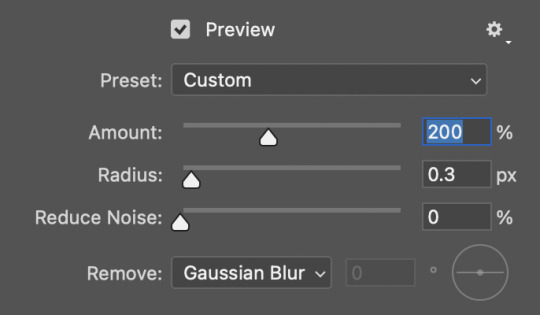
here is my smart sharpening settings!
below is my general export settings also + showing how i sort the color table by popularity
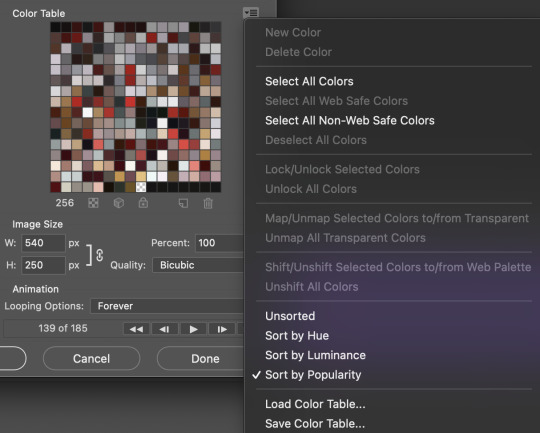
it comes in handy in case you ever need to try to bump down the size of your gif.. you can delete some of (usually the last 2 rows) least popular colors and itll reduce the size + keep the quality :)

#i hope any of this helps LOL ... if u want clarification im more than willing to write something more official than this or help more !#anon#asks#* ps help ✨
10 notes
·
View notes
Note
I wanna get into making gifs but I practically don’t know anything so I was wondering if you could tell me what applications/programs are the ones you use and some tips for beginners ?? Tysm in advance <3 - 🍊
you could start by installing photoshop. i make gifs using captures but i think this mode is older and more complicated...? most people here are making gifs using vapoursynth or avisynth. so I recommend you make gifs using one of these. you can find tutorials on how to make gifs using these programs here. aaa also, you could install topaz clean and topaz denoise. you dont need to use them all the time but topaz greatly improves the quality of our gifs and this will help you when a video doesnt have a good quality. you can start using psd because it is more practical but i think its better to start already making your own colouring. you could start with something very basic by making a base colouring. some base colouring tutorials: here and here. but if you want to start using psds, you can find some good psds here and here. but still try to make the psd work on your gifs, because most of the time if you dont change a few things on the psd it will never work well in the videos. always try to make gifs using high quality video (1080p and 1080i). try not to prioritize the speed you want to post your gifs, but the quality of your gifs. aa i see that some people here dont like to make gifs of moments that have already been giffed. try not to think like that too. make gifs because you really like doing it. notes are important, of course, but it shouldnt be the first reason that you're making gifs of something. so if a moment has already been giffed but you still want to make gifs of that moment, just make it. people will always make gifs from the same moment, even the same comp. but each gif is unique, each gifmaker has their own style. even making gifs from the same moment my gifs will never be like yours. so please dont let these things discourage you from making gifs. ps. i’m so sorry for my bad english ok );
37 notes
·
View notes
Text

For this gif tutorial I’m going to try to keep it as basic as possible, I may add a few tips for coloring at the end, but for the most part this is going to be how I make my basic gif. Also I’m not going to use my vapoursynth to process the video beforehand, just because I know not everyone uses it and it’s harder to learn. This is going to be just a downloaded mp4 video through the gif process. Don’t let the idea that this is a BASIC TUTORIAL fool you, I’m going to try to teach you a lot of things. It’s gonna get wordy, but i will try my hardest to keep the process easy. I’m just going to explain what things do instead of having you just copy + paste my method and not know what it means. okay? okay.
Before we start though, if you plan of giffing live stages you either need to accept the they will not be super crisp and clear OR learn how to use avisynth/vapoursynth to resize the videos without quality loss.
If you just want to gif music videos or variety shows then this should still give you HQ gifs.
Other notes:
try to ONLY use 1080p and up video if possible, maybe 720p if you’re really desperate, but anything under that... it’s not going to look good at all, so try to avoid using them.
The Photoshop I am using is PS 2020, so all my screenshots will be from that version and with my weird set up. But I’ve been using pretty much the same method since cc 2015 so other than the fact that some placements and names are tweaked, it’s the same. (If you can’t find something on your version shoot me an ask and I’ll try to help! And asks I get on this tutorial I’ll link HERE for future reference)
CUTTING VIDEO
To cut videos I’ll just use my quicktime player.
I use edit > trim to select the portion of the video I plan to gif and save that as it’s own new mov file.
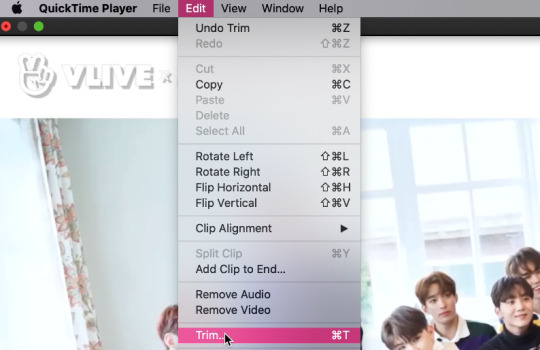
which pops up this tab

that you just slide until the part you want to gif is selected

then just save it as a new video and your done with part 1
ENTER PHOTOSHOP
Now what we’ll do is open our photoshop and import that clip into layers
FILE > IMPORT > VIDEO FRAMES TO LAYERS and select your video.
A small pop up will appear to show the clip you’re opening, you can trim it further here or just keep going by clicking okay
my setup is weird for drawing BUT you should have it looking remotely like this:
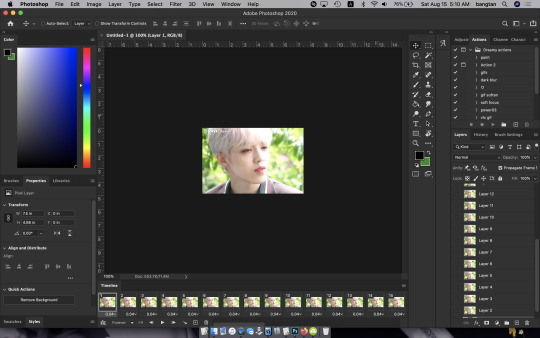
The things you will DEFINITELY need to see are TIMELINE, LAYERS, ADJUSTMENTS. If you don’t have these sections you can add them to your screen by clicking on the WINDOW tab at the very top menu bar and clicking on them

LAYERS - this is pretty self explanatory but each row is a layer in the gif. the more layers the bigger the gif will end up, the longer it plays. So bigger clips will have more layers and end up as larger gifs in the end.

TIMELINE - This is where you can edit the gifs timing (make it faster or slower)
We’ll be doing a bit of work with it so it’s important to know it well
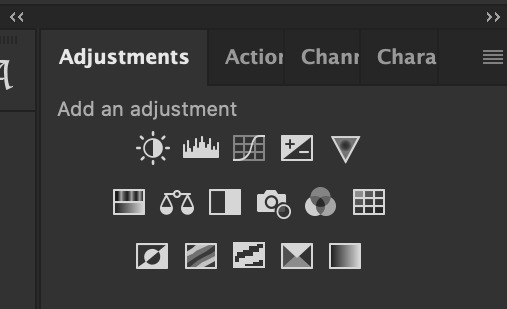
ADJUSTMENTS - Best friend and worst nightmare. this is where ALL the tedious recoloring is done. VERY rarely would you not use these. 99.9% of kpop things are filmed through a green or blue lense so you’ll want to fix that to not have ghost idols
So, Let’s make a gif
Step 1 - In the top right corner of your timeline is a set of lines, click there and then click SELECT ALL FRAMES

under each frame is a time stamp (this video’s is 0.04) this decides how fast each clip goes by, or how quickly the gif moves. Personally I prefer slower gifs, but I say anywhere between 0.04-0.06 is a decent speed.
Step 2 - with all the frames selected, click on the small down arrow next to any of the frames and change the speed to your liking. (I’m going to use .06)
Step 3 - in that same tab of lines we’ll now click CONVERT TO VIDEO TIMELINE, which will change our Timeline to look like this:

Step 4 - Back in our very TOP menu we’ll click SELECT > ALL LAYERS, then on the TOP menu click FILTER > CONVERT FOR SMART FILTERS (this might take your computer a minute since our File is still pretty large.) Now our Time line will look like this:

Step 5 - Sharpening
This one is VERY MUCH something you’re going to have to play with to get your settings to be how you like them. It’s also where I’d use topaz adjustments, BUT since I said we’re doing basic PS gif we’re just going to be using smart sharpening. SO:
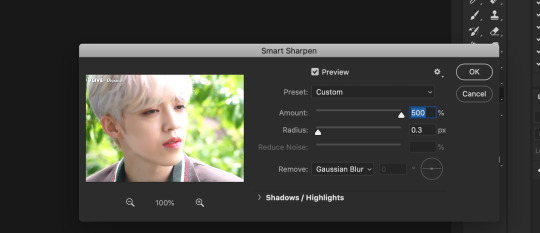
in the TOP munu again, click FILTER > SHARPEN > SMART SHARPEN
A pop up window will appear and you can edit the settings to your liking. Mine:
Step 6 - Resize your gif or crop it to tumblrs standards: big singal gifs have a 540px width || Two gifs use 268px || and three gifs use 177/178px
To do this we’ll use the crop tool and type in our dimensions in the menu bar:

and then crop to your liking. (this doesnt resize the gif it just crops to the correct ratio so we still have to shrink the gif)
Next, we’ll resize the gif to that size in the TOP menu click IMAGE > IMAGE SIZE a pop up menu will appear and you’ll type in your resize ratio and click enter.
Now technically thats a gif. it’s TECHNICALLY done. but mine is white washed and there are words on it that I dont want so onto the coloring and blurring.
First I’m going to show you how I blur text on gifs. because text is EVERYWHERE in kpop content and it’s hideous and I hate it. so lets kill it.
BLURRING LETTERING
First we’re going to add a new blank layer to our LAYER TAB by clicking the little box with the + inside at the bottom

Sometimes doing this can mess up the timeline’s selection but its SUPER easy to fix so lets do that.
So in our timeline we have these two bars on each side that select what part of the gif will play. this is also where you can readjust your gif if it has extra frames at the end, or it ends up being too large and you have to make the gif smaller to save it. Just click and drag the bars back to where our gif actually ends, and all is fixed!

Now on our new layer we’re gonna take a paint brush (one of the ones with a lot of fade NOT the solid circle ) and paint over where the words are like so:

MAKE SURE ITS ON OUR BLANK LAYER AND NOT THE GIF LAYER!!
I know it looks stupid but trust me okay.
Now in your LAYER tab we’re going to duplicate our gif layer by right clicking on it and selecting duplicate.
Then we’re going to drag the new gif layer so that it’s above the paint layer in our LAYER tab :
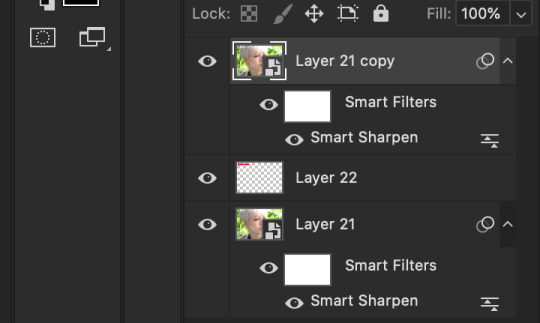
Now, right click on the top gif layer and select CREATE CLIPPING MASK. it should put a little down arrow to the left of the picture, toward the paint layer. This means the gif is ONLY visible where that paint is now.
So we’re going to click on FILTER in the TOP menu again (while we still have that top gif selected!) and Go to BLUR > GAUSSIAN BLUR. a pop up menu will appear and you can just drag the radius until the text is as blurry as you want it to be. (also IF you missed part of the text, you can just go add more paint to your paint layer and it will blur wherever you paint!)
so now my gif is like so:
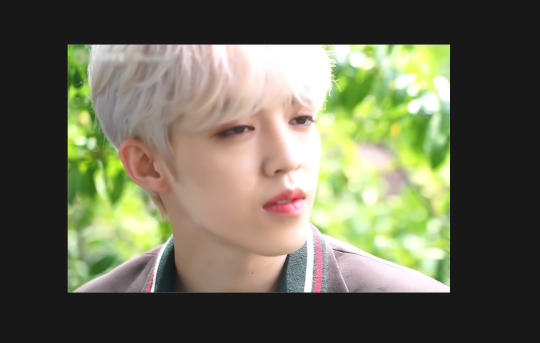
So now we’ll color him, because he’s pretty washed out.
ADJUSTMENTS
This is where I’m going to be the least specific about what I do and more about what tools do, so that you can learn how to color things the way you like them!
The Adjustment tab on Photoshop has 16 options but I’m really only going to talk about 6 of them. We’ll do it in order though. All the actual adjustment tools will open in the PROPERTIES tab
Brightness / Contrast - Pretty self explanatory, but definitely should be toward the end of your coloring, as if can effect the quality a lot. Small adjustments do A LOT so don’t go crazy,
Levels - Levels is all about the balance of how dar or light your gifs will be if you adjust in the RGB layer it will adjust for the entire image, but if you change the selection to RED/GREEN/BLUE it will adjust just those colors hues. Also there are three small droppers to the left of the graph. using those you can select which part of the gif you want the image to recognize as the lightest/darkest part of the gif, and the tool will adjust the gifs coloring to that point. ( play with those droppers! magic happens i swear!)
Curves - Kind of like levels but instead of how light or dark the entire image is it works more on contrast. REALLY play with the curves options, i’m sure most things you can do with other tools can also just be done in curves if you’re patient enough to learn
Vibrance / Saturation - Vibrance will make duller parts of an image higher contract and brighter and saturation will make everything a more neon shade. or in reverse lowering vibrance will dull out the things that were already neutral and saturation will dull out the more vibrant parts of the image (usually reds)
Color Balance - Good for fixing tones. so if a live stage is SUPER BLUE!!!!! you can readjust and calm down the blues to dull them out or get rid of them completely. Again play with this its insane what it can do
Selective Color - adjusts the different colors in your image without touching the other colors. if you wanna touch the reds, make them pinker but not change the blues and greens, you do it here
If you want MORE drawn out explanations of what each of the 16 adjustment layers do here and here are actual articles you can look at. But it’s all about practice. playing with all the adjustments alone and together. Finding out what you like to do!
Now when you gif is ALLLLL colored and you’re ready to save it we do FILE > EXPORT > SAVE FOR THE WEB and a whole new window of options pops up. I’ll give you two examples of how to play with those options and then we’re done!

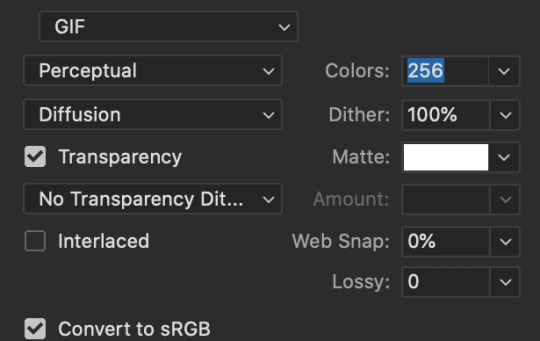
keep in MIND tumblr’s gif limit is 10MB which is pretty huge now, but still watch your gif size!!!!
AND SAVE your done!

I hope this was helpful! Let me know if you have any questions,again I’ll have an ask tag for it and it’ll get linked HERE if people end up needing help!
Happy giffing!!!
#drm.pst#drm.txt#Gif tutorial#this is LONG okay please be aware of that before you open it#als i did NOT reread it because it took me 3 hours to type out so it's probably a grammatic nightmare#BUT i'm JUST under a new milestone so i'm gifting this early because i had the patience to do it today lmao
106 notes
·
View notes
Note
Would you mind sharing your sharpening settings? Your gifs are stunning!!
thank u so much for the compliment 🥺 i normally just use the denoise and sharpening filter in vapoursynth (u can get it, if u dont have it already), the ones called KNLM and Finesharp. these are the settings i use for most gifs i make

if the video quality is a bit grainy (for example the file for my recent olivia hye gifset) ill increase both to around 2.5 or 3 like this

If still the gif is grainy ill use topaz denoise and/or topaz clean on photoshop. For topaz denoise i use an action originally from kpopper-luv (u can find it in the description of this video) and for topaz clean i normally play around with the “edges” and “clean” settings. It really depends on the file or gifset im working on, for example when i gif anime or cartoons ill keep the shaprness low (because i like softning the edges) but normally when im giffing kpop files ill increase the sharpness like this

So that’s basically all i do in terms of sharpening, thanks for asking, hope this helps
#Anonymous#mail#again thanks for sending this :((#it made me super happy#if u want links for topaz denoise and topaz clean just send another asks ill look for them
10 notes
·
View notes
Note
How do you make your gif so hd? I use topaz and adjust the settings in sharpening but still not that hd :(
i use the finesharp and knlm denoise filters in vapoursynth and then in photoshop i put a blur layer @ 20% opacity over all my gifs. i actually dont use topaz! - ken
It depends on the quality, i usually just use finesharp in vapoursynth - dee
avisynth + photoshop! avisynth gives it some nice strong sharpening and if i have to i can smoothen it out with ps - an
1 note
·
View note
Note
hi cher! idk if this is gonna make sense so you dont have to answer if it doesnt but i recently got into kpop & i noticed that a lot of kpop gifs have this glow(?) to them. i came from the film side of tumblr where a lot of the gifs would just be color graded & sharp, pretty similar to the original but here, gifs make idols look glowy & distinctly different & brighter? i was wondering if there are settings you usually use to do that? (like your minlix set from skzcode 4 or tom & jerry set!)
hello! no worries at all, i get what you mean. movie gifs are more true to their original colors cus movie giffers usually just enhance contrast and vibrancy, and they sharpen a lot more than kpop giffers + don’t denoise/smoothen their gifs
a lot of kpop giffers use grussian blur layer(s) in ps and/or denoise with vapoursynth or topaz, which creates the glowy/soft look. running videos thru vapoursynth itself also makes the gif look smoother (movie giffers use different screen capture programs; the gifs naturally look sharper than vps-captured gifs).
coloring/psd can also bring out that softness, especially if you decrease the highlights/contrast, add gradient filter(s) to “dull” the sharpness, make the color palette more uniform/harmonious instead of popping in vibrancy/contrast (just some of the things i did for the 2 sets you mentioned). i don’t have my laptop rn so i can’t rly show what i mean but i hope this makes sense in words 😭 lmk if u have any more questions or just send a dm i’m happy to help 🦑
#basically that glowy/soft look is achieved half by sharpening and half by coloring!! and it’s the preferred look among kpop giffers#it’s definitely a choice/preference cus i’ve seen film/tv styles on kpop gifs too#i hope i’m making sense.. fhjffhf#asks#ps help
3 notes
·
View notes
Text
youtube
i was tagged by @yoonmochiiii to do a gif video process , so heres mine!
i normally use vapoursynth and photoshop, im switching between sharpening on vapoursynth and photoshop but i mainly do all my sharpening on photoshop
as for the coloring, i use my but it tends to change a lot. anyways the current one i made is here
i have no experience on topaz so yeahh i dont use, from what i heard it takes too long. it usually takes me about 20 to 30 mins to make a gifset maybe longer when i get distracted haha
i tag @geniuslab @jjoon @sugaforyou @jeonsdear @kooktae @cherryjk @yoongikook @agustd02 @bangtanger @eternal-bangtan @minietaes @miniejoon @guksdimple @raplinesoutro @knjspjm @jkks
23 notes
·
View notes
Note
VERY odd question but do you have any tips or words of advice for people who are starting to make gifs for the first time?? i love ur work its always super pretty to me v aesthetic 10/10 so i wanted to ask the source of inspo for advice lol
first of i’m sorry for the late reply 😭
but this is the tutorial i used when i started making gifs (minus the modify/contract step) and i only use topaz when i gif ending fairies because it takes A Lot of time to process! and now i almost always use vapoursynth (+ photoshop cc 2019). for vapoursynth you’ll have to play around with settings until you find what you like (by using the preview button)
the dimensions of gifs are really important so they dont end up blurry!!
i use 4K video downloader to download vids from youtube and soshistagram for vlive
i’d recommend @chaoticresources @yeahps and @allresources for links, tutorials, fonts, overlays etc!
#i hope it helps!!#if you have any other questions feel free to ask!!!!#and thank u for your compliments on my gifs it means a lot 😭#ask#anon#not skz
11 notes
·
View notes
Note
do you keep the same avisynth & photoshop settings for everything, or do you mix it up depending on what you're giffing, e.g a live stage vs a drama ?
hi!! so i recently changed from avisynth to vapoursynth bc i finally got it to work but ill explain both!!
for avisynth:
for stages i would do 30 slow + deblinlier (or however u spell it) and than i would use a pretty intense sharpening + topaz clean combo in ps
for dramas i basically just ran it through avisynth for the deblinier function and than would do a pretty typical sharpening w/guassian blur combo
for vapoursynth
im gonna be real with u i stole the basis of @laytalay sharpening ajfkdslfjdskl and i do the same thing for both basically! the only difference is for stages i do the 30 slow which regular vids dont need, but the settings are BM3D on 5.8 with finesharp on .50, and than i do a sharpening action on top of that with the smart sharpen being 500% on 0.3, and than i duplicate that layer and have a guassian blur of 1.3% with the filter on that layer being around 45%
8 notes
·
View notes
Note
hi ! do u have any tips for someone who is just starting to make gifs??
hello love! since you asked for tips and not a tutorial i’m assuming you’ve got a handle on the process? so i’ll tell you things i do that i think make a difference in the process
firstly, a good ps. like we all here with our pirated versions of photoshop but one with a timeline is essential. ive giffed using every single trick in the book and there’s nothing faster or better than a photoshop that actually works. i did a very messy poor tutorial on how i cracked my og photoshop here if you want to try it out, it has 0 glitches
second, avysinth/vapoursynth. i use avs bc thats what i found for windows but some have said that vapour is faster and easier? regardless here is a wonderful tutorial. trust me when i say this program changes your life as a gifmaker.
regarding footage, aaaaalways go for 720p at least. i download all my videos 1080p unless there isnt a source with that format.
topaz denoise is very nice if you dont have avs. topaz clean makes everything looks soft and i love it and use it on everything.
i usually use gaussian blur at 1.0 - 1.5 / opacity 30 - 40% as well with a smart sharpening on top of it. i personally like the edges of my gifs looking soft instead of over sharpened.
time between frames: 0.07 - everything that isnt’t that looks either too fast or slow for me.
practice a lot! find things you like to gif and keep giffing! really, practice is key. and remember giffing is supposed to be fun! i love it, esp coloring, so try everything and see what suits you best ♥
20 notes
·
View notes
Note
hii i hope ur having a nice day ur gifs are really stunning :( i just started gifing so i wanted to ask what applications u use if u dont mind!! ive been using topaz in ps but it gets on my nerves lol
oh thank you so much! i use topaz sometimes if it’s necessary but i mostly just stick to vapoursynth (a scripting video editor, used to resize gifs without frame loss) and ps. if you have a pc instead of a mac then the equivalent program to vapoursynth is avisynth.
1 note
·
View note
Note
hi! idk if you've already answered smth like this, but would you ever make a gif-making tutorial? i dont know where to start with gif-making >< but if not, it's totally cool! would you happen to know where i can learn how to make gifs like you? thank you!
sure! i absolutely would!! i’ll just do it under this ask haha
so for making gifs i use photoshop ( i run cc 2017 bc it was th only free version i cld get ldsfkhsdf) and vapoursynth!
first things first: getting the video you want to gif. obviously the better the quality of the video the better the quality of gif, so when im downloading from youtube i usually use a 4k video downloader
if its vlive i use soshistagram !!!
next step after youve downloaded your gif is to get the frame layers from the specific section that you want to gif. thats where vapousynth comes into play.
if you drag the video you downloaded into vapousynth, you choose the part within the video you want to gif, so say im remaking my last gifset id drag the video into vapoursynth put in like 00:05:40 (the starting time in the video where i wish to gif) and then like 00:00:03 (how many seconds of the video after the start i want vapoursynth to render) and then it’ll open up a tab that looks like this

from here this is where i usually do my cropping, sharpening and denoising – i use to use topaz labs but that shit hurt my computer like it would take so long for my computer to render it it wasnt even worth it. but i mean topaz labs is pretty good so if your computer is strong enough i definitely suggest looking into it. i just cant lmao.
okay after you choose the settings that you want (honestly the way i found my preferred settings was just by playing around w them!!), you copy and paste the coding in the white box in the right corner into the app that will open on your computer once you run vapoursynth it looks like this

you paste the code into the section that says ‘paste here what you copied from resizer’

and if the section of the video runs longer than you wanted (like the screen changes n u just want to cut it out) you can trim it in this app as well if you go to Script > Preview and find the first frame and last frame that you want in the gif. honestly i dont usually do this, i just delete frames in photoshop bc im lazy but then it obviously takes longer to render but . again. lazy.
ANYWAYS once you’re ready to render your video, you go to Script > Encode video and another screen will pop up. make sure you change the header section from ‘no header’ to ‘Y4M’ or it wont work. n then just press start and it’ll do its thing. on my computer it saves the video to my ‘output’ folder and its always titled ‘output.mov’ so it shouldnt be hard 2 find !!
ok !!!!!! hardest part is out of the way!!!!!!! wee!!!!!
now its time for photoshop *crowd boos*
once you’ve opened photoshop, you go to File > Import > Video Frames to Layers and find the video that you got from vapousynth ! once you do that this will come up

here you can cut down the video / limit the frames for its import. i usually limit frames only by 2 or i find it gets a lil weird, this helps a lot if your video is long and you want 2 get it all in the gif without missing parts while also staying under tumblrs gif limits (which i know have been made a lot bigger but i still try to keep mine around 3 MB). then once all thats Done just press OK n it’ll look like this !!
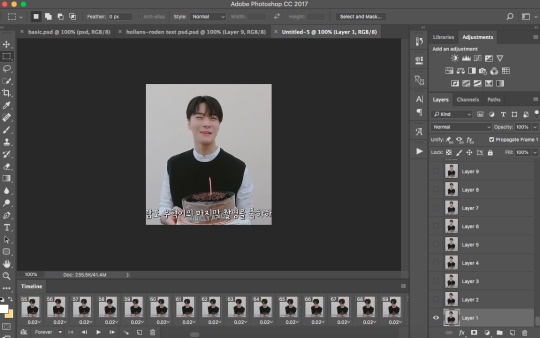
ok lets break this down
TIMELINE

timeline is basically where u go to adjust the speed of your gif. if you press on the three lines on the right side and press Select All Frames then you can click on the time (in the screenshot its 0.02) and adjust it. i usually go with 0.05-0.06. but it depends. again its all up to your preferences. you can also delete frames n stuff, thats usually what i do to trim down a gif.
LAYERS SECTION OR WHATEVER ITS CALLED

ok so these are all ur layers !!! usually i select them all and group them so its easier to manage. but this is where you’d add your colouring PSDs or text PSDs to spice up ur gif.
at the top where it says ‘Add an adjustment’ is where you can edit the colour of your gif, you can obviously mess around and make your own psd or even go Crazy and make a new psd for every gifset. but personally, out of laziness, i just searched tumblr for gif PSDs and used the one i liked the most, and through that i adjust it depend on what i think looks best for the gif im working with. psds make the gif tbh

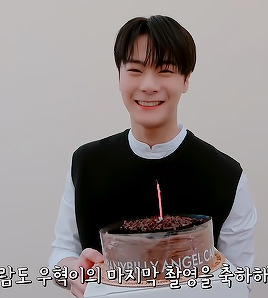
like the difference... the spice.... the vibrance... its beautiful.
sometimes i use the sharpening action and in order to use the filters in photoshop you have to change it into a video timeline (see timeline section, at the left bottom corner theres that icon thingy beside where it says forever. just click that) then you select all your layers at the side and go to Filters > Convert for Smart Filters.
then you can go Sharpening and i usually use Smart Sharpen. and its again messing around until your satisfied with how the gif looks. this is my preset for it!

also through this you can blur out words in the gif (which obv u dont have to do its another preference thing i just personally prefer to do it) and once your gifs been converted for smart filters you can use the marquee tool to section off the part you want to blur and then go to Filter > Blur > Gaussain Blur and adjust the strength of the blur !
anyways. thats basically it???????? after your finished and you’re happy with how it came out go to File > Export > Save for Web (Legacy) and this will pop up

here you can see how many MB’s your gif is to ensure you dont go over. also adjust the presets on the side, thats just how i have mine obviously you can adjust yours to however you want them !
and make sure where it says “Looping Options” it says forever, or else your gif wont loop and you’ll want 2 rip ur hair out once u realize it.
n then boom
gif !
i hope this helped ???? n wasnt too confusing im rly bad at explaining things.. i also hope i didnt miss anything .. but i dont think i did. if you have any questions pls feel free to message me ill b happy 2 explain anything else im able to ^________^ !
1 note
·
View note
Note
you dont have to answer this, but how do you sharpen your gifs/your base settings for them? and when you export the gifs, what are those settings? bc ive been trying to export it so the gifs turn out smooth, but they always end up grainy :(
hello! it really depends on what kind of scene im giffing but i usually rely on vapoursynth to sharpen and denoise and once i put it into photoshop i add my coloring and if i feel the gif still needs more work ill add one or two filters of smart sharpen + a filter of topaz denoise
this is the code ive been using lately for vapoursynth:

and these are my save for web settings:

i find that pattern really helps to mask imperfections in gifs so maybe try that out if you have a problem with graininess!
#let me know if you want a in depth tutorial on how i gif! i'd be more than happy to help <3#ask#anon#Anonymous
2 notes
·
View notes
Note
hey! I absolutely adore your gifs and was wondering if you would be willing to give a tutorial or something on how you do them, ive been wanting to start making my own but I’m finding it real difficult. If not that’s fine, have a good day! :)
hi - of course!
shinyunas/nctmark/izonechu made a good tutorial here: https://itzy.cf/post/186759375366/hi-do-you-have-any-tutorials-for-how-to-make
i pretty much do the same thing, but i’ll just list a few things i do differently/would like to mention!
1. i sharpen in photoshop and clean/denoise using topaz (u would need to torrent this and can probably google a tutorial for it from tumblr). it’s honestly just a personal preference thing to not use vapoursynth. i tried it before here but it didn’t really suit me! i also try not to use topaz clean as often as possible because (a) it takes double the time and (b) i realized this also doesn’t suit me! however when a video clip is not hd or i need to zoom in a lot, i use topaz clean to try making up for the pixelation. i also avoid using clean at all costs when it’s not a closeup because it makes faces look weird if they are too small imo. you’ll have to play around with the settings to see what you think looks best. the only ‘right’ way to do it is whatever you like the most c: –> applies to everything here!
2. color and adjustment layers are really what makes ur style and they make gifs stand out. personally i first white balance using levels or curves. then i adjust saturation/vibrance and use selective color and hue/saturation to adjust the levels of each color. careful with the saturation because high saturation can end up highlighting the dither of the gif. at the end, before sharpening and what not, i add solid color layers and play around with them depending on the color scheme im going for. i like using hue/soft light/overlay/multiply/difference or a combination of those and play around with opacity. if u dont know what something does, google and watch some videos on it. don’t use tools without knowing what they are for because you might change other things unknowingly that may affect your gif later. you can also use other people’s psds if you want, but i personally think each gif needs a diff coloring. i’ve only downloaded psds in the past if i really wanted to figure out how someone got a certain vibe off
3. before the color adjustment, i delete unwanted layers, convert to video timeline, and turn all frames into one smart object. after adding adjustments, i apply the sharpen/topaz filters to the smart layer. dont play the gif after u put topaz on… ur computer will glitch out LOL. convert frames > flatten frames into clips to get ur post filter frames. then delete non-visible layers and convert back into frame animation timeline. (i hope i got the names of these right lmao i set shortcuts for everything so i dont click any menu for anything LOL)
if i need to blur out words - after filtering i would convert it into a smart layer again. then use marquee tool to choose the area with the words/logos and 1.3 gaussian blur it (i prefer 1.3 because it’s just enough for me to not notice it but not so much that the blur stands out… once again personal preference!)
4. my export settings

i use different sorting depending on what i need to know e.g. if the gif is too big i can sort by popularity or hue and try to take out colors that don’t affect the gif that much. (for some reason my gifs need to be below 2.85MB to upload on tumblr lol)
5. just keep making gifs and have fun! it’s honestly hard at first, takes a lot of time, and can be a pain in the ass. here’s my first gifset on this acc lol https://joyuls.tumblr.com/post/181169072903/la-vie-en-rose-eunbi-mama-in-hong-kong-2018. definitely not my greatest work, but i guess it reminds me that i worked hard haha. but as long as you enjoy the process instead of the results, it’ll be worth it, and your gifs will start looking a lot better before you know it. hope to see your content around soon, and feel free to ask more questions if you have!!
6 notes
·
View notes
Note
Hey, hellooo! What program do you use to make your gifs? I tried vapoursynth but I didn't even understand how to open it. Before I used to do photoshop, but I can't fix a problem with dynamiclink. :(
hii! yeah i only use photoshop now. i tried both vapoursynth & avisynth but they were too much hassle i just never bothered to use them again (or im just too lazy tbh). i also used topaz plug-ins & i loved them so much but the trial ended & i couldnt find a cracked safe version so i just went back to my normal sharpening/cleaning settings.
if you’re having trouble with ps, try to delete the app & reinstall it all over again. i dont remember where i got my current version from, but if u want to dm me privately i can try to find it for u! good luck ♡
1 note
·
View note